
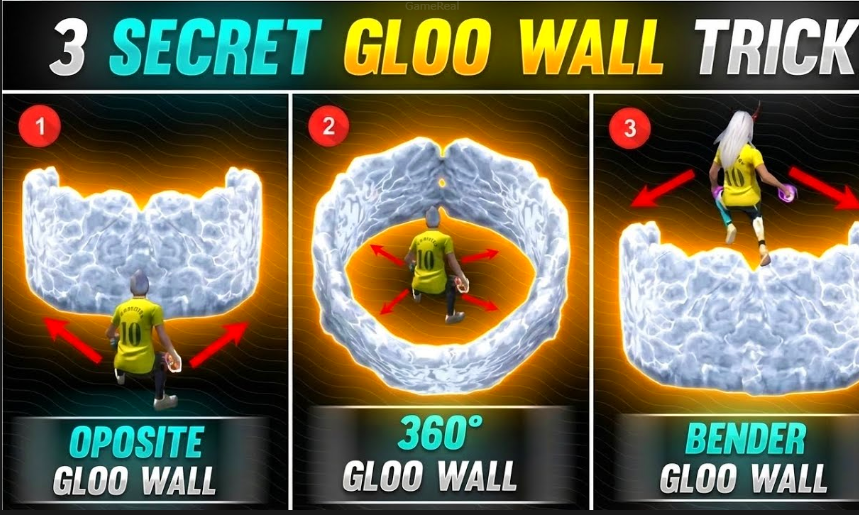
Best Free Fire Gloo Wall Tips & Tricks for 2026 Victory
Hey survivors! If you’re serious about climbing from Diamond to Grandmaster in 2026, Gloo Walls are the single biggest skill gap between average players and the pros. These ice barricades aren’t just “cover” anymore — they’re weapons that let you control the entire battlefield. In OB55, with the giant combined map dropping and longer games turning into 30-40 minute slugfests, a single well-placed Gloo Wall can decide whether you survive a third-party fight or get knocked out instantly.
I’ve tested these tricks myself in the Advance Server and seen thousands of players rage-quit because they didn’t know them. This isn’t some basic “just place walls near you” advice. We’re talking pro-level placement, finger tricks that pros use, HUD setups, timing, counter-play, and exactly how to farm them fast so you never run out in ranked.
Let’s get straight into it.
Why Gloo Walls Matter More Than Ever in 2026
Garena buffed Gloo Walls hard after the Kairos nerf in early 2026. Walls now survive 4-5 shots instead of 2-3, and the giant map makes fights happen across huge open areas. One wall can block a 20-meter angle or create a safe lane for your squad to push. Pros treat them like natural cover — you see someone aiming, you place a wall before they fully commit. That 0.3-second timing difference is what separates Heroic from Master.
In Clash Squad, economy is king. Saving two walls per round is standard, and in the final circle you need 3-4. Mess up and you die with no way to reset.
HUD & Sensitivity Setup for Fast Gloo Walls (The Pro Trick)
Your phone is the biggest obstacle. A sloppy HUD and low sensitivity is why most players fail.
Best 3-Finger HUD Layout (2026 Meta)
- Left Index Finger: Always-on fire button (top-left corner).
- Left Thumb: Gloo Wall button + movement joystick (put Gloo Wall right next to joystick, 80-100% size).
- Right Thumb: Aim + jump + crouch + weapon switch.
Place the Gloo Wall button on the left so you never have to move your thumb across the screen. Test in training ground — if it feels clunky, enlarge the button to 100% and move it closer to your natural thumb rest.
Sensitivity Settings
- General Sensitivity: 100 (max)
- ADS: 100
- Zoom Sensitivity: 100
- Camera: 100
On low-end phones (2GB/3GB), drop to 85-90 and increase DPI in developer options. The trick is muscle memory — you want to place walls without looking at the button.
Crazy Tap Macro (PC Emulator + Mobile) If you play on emulator or want extra speed, set Crazy Tap to 70-80 for Gloo Wall button. It lets you spam walls faster than any human. Save it and test in custom rooms.
Core Technique: Place Before You Commit (The #1 Pro Rule)
Never drop a wall when you’re already low HP or in a bad angle. The best players see the enemy and place the wall the moment they know a shot is coming.
Step-by-Step Execution
- Spot the enemy aiming at you.
- Immediately crouch (free cover).
- Hold left fire button (never let go).
- Flick camera to the exact spot you want the wall (hip-fire crosshair method).
- Tap Gloo Wall button.
This makes the wall deploy right in front of your face — perfect one-way cover. Standing placement leaves gaps. Crouching makes it tight and fast.
Pro Placement Tricks That Win Fights
1. Angle Control Wall Drop the wall to block the exact lane the enemy is shooting from. In 2026 meta, this is the most used move. If they’re on the left hill, place it on the right side of the hill so their shots hit the wall instead of you.
2. 360-Degree Triangle Bunker For 1v4 or when revives are needed:
- Place first wall in front.
- Second wall to your left.
- Third wall to your right.
- Fourth if you have it — full 360 cover. Use this in the final circle when the zone is shrinking. Your squad can heal or revive safely.
3. Jump Wall (Air Placement) Mid-jump, place a wall. It creates unpredictable angles and confuses enemy aim. Great for third-party fights or when jumping over bushes.
4. Stair Wall / X Pattern While sprinting diagonally right, jump, turn camera left, place wall. Then sprint left through the wall. Repeat. This builds a staircase of cover as you push — perfect for rushing buildings or the giant map canyons.
5. Peek Wall Place the wall to the side of your position, not directly in front. Peek from the edge of the wall. The enemy has to pre-aim every time, giving you split-second advantages.
6. Fake Rush Bait Run straight at their cover like you’re about to shotgun rush. As soon as you’re in range, stop, place a wall instantly, and let them shoot. When they reload, jump around the side and delete them. Beats M1887 and MAG-7 users every time.
How to Place Walls Super Fast (Finger Training)
Sit-Up Wall Combo (3-Finger Flow)
- Crouch immediately.
- Hold left fire button.
- Right thumb flicks horizontally fast while holding fire.
- Left thumb taps Gloo Wall.
Do this 50 times in training ground. Your fingers will remember. Add a jump element after 10 minutes — sprint, slide, place; sprint, jump, place.
U-Shape Movement Pattern Never run straight at someone. Run in a wide arc, place a wall every meter. Creates a tunnel of ice walls that lets you close distance safely.
Gloo Wall Economy & Priority in Ranked
Battle Royale
- Always have at least one wall saved for the final escape or revive.
- In the giant map (OB55), games last longer — save 3-4 walls minimum.
- Pick up walls from the ground (high value loot). Drop meds, never walls.
Clash Squad
- Round 1-4: Save coins, force buy 2 walls.
- Round 5-7: Buy 3-4 walls + upgrades.
- Never buy expensive guns without walls — economy is life.
Counter-Play: Kill or Destroy Gloo Walls Enemies will try to break your walls. Use Skyler’s sonic wave, Hayato’s damage, or just spray until they’re gone. A destroyed wall is still cover if you drop a new one immediately.
Map-Specific Gloo Wall Mastery (Bermuda, Kalahari, Purgatory, Giant Map)
- Bermuda: Place walls at Black House second floor and Loot Lake edges for third-party.
- Kalahari: Use desert rocks + walls for vertical fights. Hold Command Post with triangle bunker.
- Purgatory: Mountain side placements to block ski lift angles.
- Giant Map (OB55): Place walls across the central Rift to block portals. 360 bunker when zone shrinks. One wall can now protect across 5 km of open field.
Real Player Stories from 2026
One Heroic player told me: “I used to die in every third-party fight. Now with the 360 triangle, I survive 1v3s and carry to Grandmaster.” Another Diamond player: “I saved one wall for the final circle — it saved my rank from dropping.” Indonesian Advance Server testers are posting clips of players clearing 4-story buildings with FO12 shotgun while using walls as cover.
Common Mistakes That Get You Knocked
- Dropping walls when low HP (panic).
- Random placement instead of angle control.
- Running out of walls in late game.
- Using standing placement instead of crouch.
- Ignoring natural cover (combine walls + rocks = unbeatable).
Final Words – Master Gloo Walls or Stay Stuck
Bro, Gloo Walls are the difference between surviving every fight and getting farmed every game in 2026. Take 10 minutes today in training ground, learn the 3-finger combo, and start placing walls early in every match. In the giant map era, these tricks will make you unkillable.
Log in right now, turn on your custom HUD, and practice one trick. You’ll see your rank climb in days. Drop your current rank in the comments — let’s build squads and help each other push to Grandmaster!
Booyah & Master those walls!